配置 OpenSSH 的公钥认证
0x00 前言
https://www.ssh.com/ssh/ 上的文档写得很详细但有些散碎,本文对配置 OpenSSH 公钥认证的环节进行了整理。
如果你还不了解什么是公钥认证的话,可以看: https://www.ssh.com/ssh/public-key-authentication
公私钥长什么样?
# https://www.ssh.com/ssh/key/#what-do-ssh-keys-look-like:~:text=An%20authorized%20key%20can%20look%20like%20this%3A

# 公钥 a.k.a. public key a.k.a. authorized key
# 尾部是生成密钥对的 <用户名>@<主机名>
ecdsa-sha2-nistp256 AAAAE2VjZHNhLXNoYTItbmlzdHAyNTYAAAAIbmlzdHAyNTYAAABBBN+Mh3U/3We4VYtV1QmWUFIzFLTUeegl1Ao5/QGtCRGAZn8bxX9KlCrrWISIjSYAwCajIEGSPEZwPNMBoK8XD8Q= ylo@klar

# 私钥 a.k.a. private key a.k.a. identity key
-----BEGIN EC PRIVATE KEY-----
MHcCAQEEIJWbvSW7h50HPwG+bWR3DXgQ6YhOxYbe0ifr1rRUvsUuoAoGCCqGSM49
AwEHoUQDQgAE34yHdT/dZ7hVi1XVCZZQUjMUtNR56CXUCjn9Aa0JEYBmfxvFf0qU
KutYhIiNJgDAJqMgQZI8RnA80wGgrxcPxA==
-----END EC PRIVATE KEY-----
接下来本文将以 Windows 作为本机系统、Ubuntu 作为远程主机系统演示公钥认证的配置过程。
0x01 本机使用 ssh-keygen 生成公私钥对
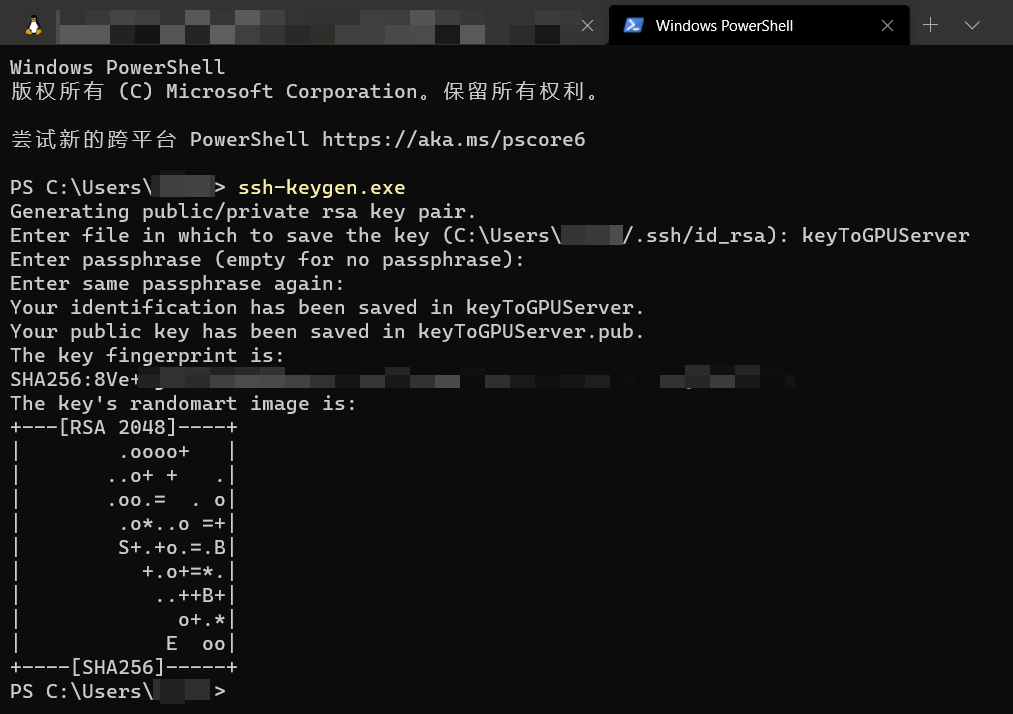
# PowerShell
ssh-keygen.exe
# 默认输出到 C:\Users\$ENV:USERNAME\.ssh\ 下的 id_rsa

# WSL
ssh-keygen
# 默认输出到 ~/.ssh/ 下的 id_rsa
密码(passphrase)对私钥的加密效果使得第三方即使获得私钥也无法完成认证过程。
需要说明的是,在手动指定密钥对的保存路径时,如果只写文件名,默认是放在启动 ssh-keygen 时所在的工作目录中。
0x02 将公钥内容写入远程主机的 ~/.ssh/authorized_keys 文件中
authorized_keys文件保存允许通过公钥授权来经 SSH 登录服务器者的公钥,每行保存一个,空行或是井号会被忽略。它通常位于
~/.ssh/authorized_keys(许多 OpenSSH 的版本也会使用~/ssh/authorized_keys2),而对一些使用客制化 OpenSSH 构建的组织来说,这个默认路径可能有变化。
方法 1:使用 ssh-copy-id
ssh-copy-id 用于在远程主机上添加公钥,它的操作逻辑为:
- 远程服主机的
~/.ssh路径是否存在?创建:下一步 - 远程主机的
~/.ssh/authorized_keys文件是否存在?创建:下一步 - (当没有使用
-f(orce) 时)远程主机的authorized_keys文件是否已包含本次要配置的公钥?跳过:添加,下一步 - 远程主机的
authorized_keys文件权限是否仅有当前用户可写入?不变:修改
其可选参数为:
| Name | Description |
|---|---|
-f | Don’t check if the key is already configured as an authorized key on the server. Just add it. This can result in multiple copies of the key in authorized_keys files. |
-i | Specifies the identity file that is to be copied (default is ~/.ssh/id_rsa). If this option is not provided, this adds all keys listed by ssh-add -L. Note: it can be multiple keys and adding extra authorized keys can easily happen accidentally! If ssh-add -L returns no keys, then the most recently modified key matching ~/.ssh/id*.pub, excluding those matching ~/.ssh/*-cert.pub, will be used. |
-n | Just print the key(s) that would be installed, without actually installing them. |
-p | Connect to the specifed SSH port on the server, instead of the default port 22. |
-h | help |
关于 ssh-copy-id 的更多介绍见:ssh-copy-id for copying SSH keys to servers,也可直接跳转到 Trouble shooting 章节
废话写完了,实际使用的命令如下:
ssh-copy-id -i /mnt/c/Users/$ENV:USERNAME/.ssh/keypair/keyToGPUServer [email protected]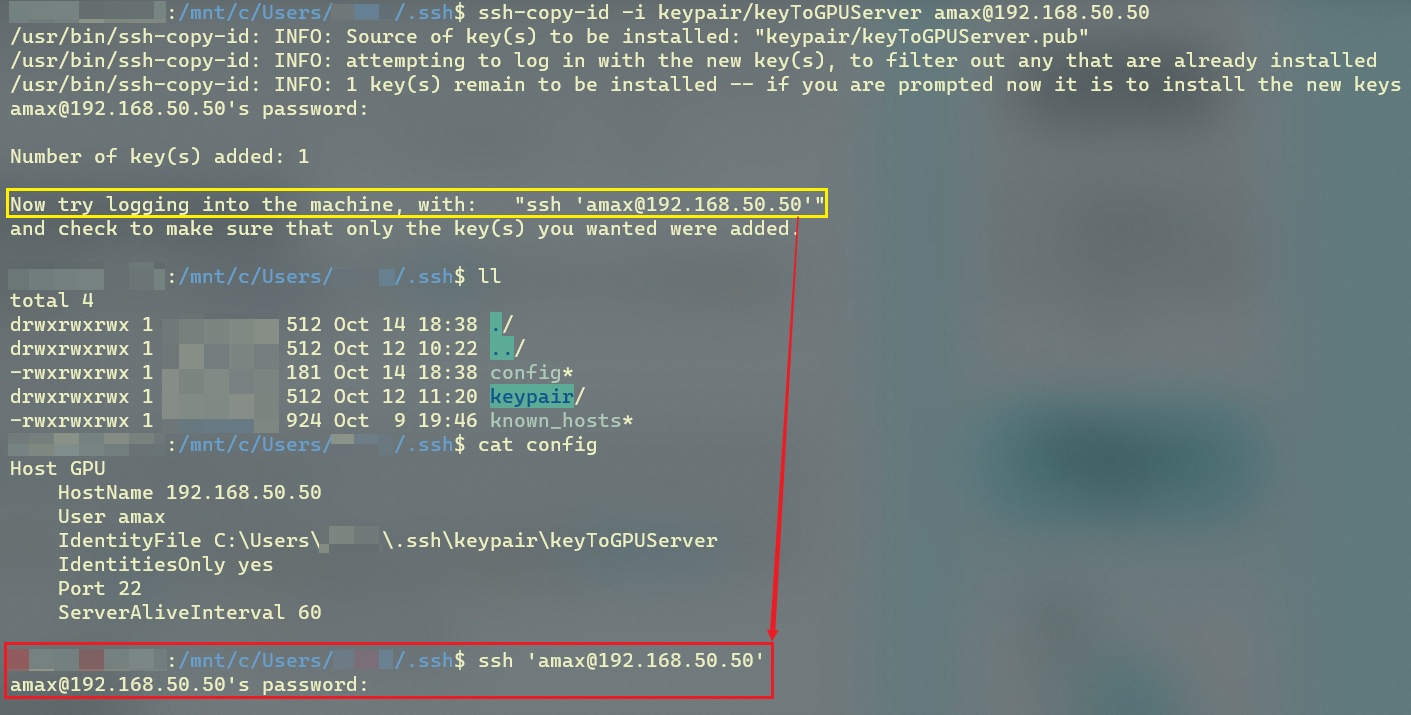
可以注意到,已成功添加了一个公钥,但并不能按照提示所说直接使用 public key authentication,后续会在 # 0x03 的 方法 2 中进行解释。
方法 2:手动拷贝
手动拷贝本机公钥内容到远程主机的 ~/.ssh/authorized_keys 文件有很多方法,此处以 scp 复制公钥到远程主机为例:
# 先复制本机公钥到远程主机的 ~ 目录
scp C:\Users\$ENV:USERNAME\keyToGPUServer.pub [email protected]:~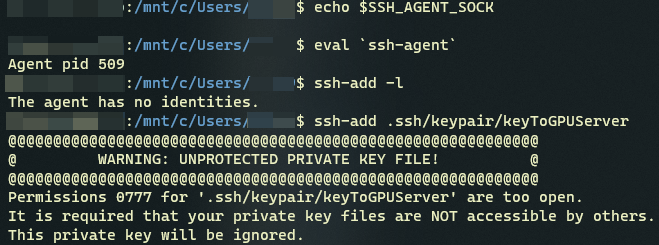
不过我这里的私钥权限太宽需要修改:
# 当前用户只读
chmod 400 .ssh/keypair/keyToGPUServer

# 当前用户读写
chmod 600 .ssh/keypair/keyToGPUServer
传输完成后登入远程主机,将公钥内容写入到 ~/.ssh/authorized_keys:
# 此时仍然需要以账户密码登录
ssh [email protected]

# 添加到文件尾
cat keyToGPUServer.pub >> ~/.ssh/authorized_keys
0x03 配置本机的私钥存储
本地主机的 ssh 程序可通过:
- 命令行(指
ssh-agent工具)- (用户)配置文件
~/.ssh/config- (全局)配置文件
/etc/ssh/ssh_config来获得配置信息。三个位置的优先级由高到低,且在每个位置仅使用首个匹配成功的条目。
方法 1:向 ssh-agent 添加私钥
ssh-agent用于保存和管理用户的私钥和私钥密码,借助它我们可以实现单点登录(Single Sign-On, SSO)。在大多 Linux 系统中
ssh-agent都已被自动配置且在登入时已启动。
使用如下命令向 ssh-agent 添加私钥:
# 检查是否启动
echo $SSH_AGENT_SOCK

# 手动启动
eval `ssh-agent`

# 显示 ssh-agent 已安装私钥
ssh-add -l

# 从 ssh-agent 移除指定名称私钥(不删除密钥文件)
ssh-add -d keyToGPUServer

# 从 ssh-agent 移除所有已添加私钥(不删除密钥文件)
ssh-add -D

# 从默认位置添加默认名称的私钥
#  ~/.ssh/id_rsa, .ssh/id_dsa, ~/.ssh/id_ecdsa, ~/.ssh/id_ed25519, and ~/.ssh/identity
ssh-add

# 手动指定私钥位置和名称
ssh-add keypair/keyToGPUServer
测试:
# 成功认证
ssh [email protected]
amax@admin:~$
方法 2:将私钥信息写入 ~/.ssh/config 文件
Windows 下的对应文件是在 C:\Users\$ENV:USERNAME\.ssh\config:
# https://www.ssh.com/ssh/config/#configuring-public-key-authentication
Host GPU
    HostName 192.168.50.50
    User amax
    IdentityFile C:\Users\$ENV:USERNAME\.ssh\keypair\keyToGPUServer
    IdentitiesOnly yes
    Port 22
    ServerAliveInterval 60
这里的 Host 名称一定要起一个好记的,因为在之后使用 ssh 进行公钥认证时匹配的就是这里的 Host 名称而不再是 <username>@<ip-address>,本文第二张图下方没有成功通过公钥认证就是这个原因。
测试:
# 如果前面还通过 ssh-agent 添加了相同的密钥,要先删除掉。因为找密钥的时候它的优先级更高
ssh-add -d keyToGPUServer

# 只能通过 Host 名称才不要密码
ssh GPU
amax@admin:~$

# 如果是通过用户名主机名去登录就还得输入密码
ssh [email protected]
[email protected]'s password: